Subdevice Configuration |
|||
Notes:
|
Click ![]() to expand the device in the Devices View.
to expand the device in the Devices View.
Click on the subdevice.
If the Properties View for the subdevice is not already open, select View > Properties, or press F4.
It may be useful to name the subdevice:
In the Common section, enter a name in the Name field.
Click ![]() .
.
The subdevice is renamed in the Devices view.
You can change the way most subdevices operate, setting any of the available functions to a subdevice (but there are some exceptions). The following modes are available:
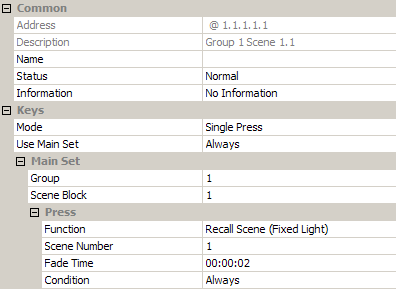
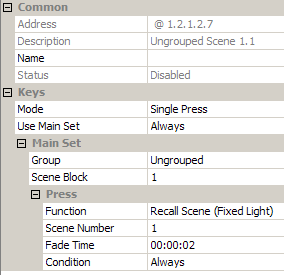
Single Press: Denotes a single button press to perform a function. The action happens when the button is down. For more information, see Single Press Configuration.
Timed Press: Two functions for the same button: a short press function and a long press (press and hold) function, and both can perform different actions. The second action happens when the button is released.
Toggle Block: Can perform any three functions for the scene block. For more information, see Toggle Block/Solo Configuration.
Toggle Solo: Can perform any three functions for the scene. For more information, see Toggle Block/Solo Configuration.
Modifier: Up/down by default, but can perform any two functions to the light levels in the group, scene or last scene called in the scene block. For more information, see Modifier Configuration.
Touch Dim Block: Can perform any two functions, and lower/raise levels, for the scene block. For more information, see Touch Dim Block/Solo Configuration.
Touch Dim Solo: Can perform any two functions, and lower/raise levels, for the scene. For more information, see Touch Dim Block/Solo Configuration.
To change the mode of a subdevice:
In the Keys section, click in the Mode field.
Click ![]() , and then select the required mode from the drop-down menu.
, and then select the required mode from the drop-down menu.
The options in the subsequent sections change depending on your selection.
Click ![]() .
.
If you want the subdevice to perform the set of functions according to a certain condition, and if the condition is not met, do the following to use an alternative set of functions:
Note:
|
In the Keys section, click in the Use Main Set field.
Note:
|
Click ![]() , and then select the condition from the drop-down menu.
, and then select the condition from the drop-down menu.
Click ![]() .
.
For more information, see Conditions.
Tip:
|
In the Main Set section, click in the Group field.
Enter the group to which you want to assign the subdevice.
Note:
|
Click ![]() .
.
The DALI standard specifies that the subdevices in a device may be assigned only to scenes within the same scene block. This is why it is necessary to choose a scene block, rather than choose any scene in the Workgroup Design.
Tip:
|
In the Main Set section, click in the Scene Block field.
Enter the scene block to which you want to assign the subdevice.
Click ![]() .
.
Note:
|
The next steps depend on the mode that you have chosen for the subdevice.
When you change the function of the subdevice to Direct Proportion, this value relates to a proportion of the difference between the last recalled scene level or direct level and the output limits of the device.
If you set a positive value, this is a proportion of the difference of said level and 100 % level. For example, if the last recalled scene level or direct level is 44 % and you send a ‘Direct Proportion at 50 %’ command, then the level rises from 44 % to 72 % (100 – 44 = 56; 56 × 50 % = 28; 28 + 44 = 72).
If you set a negative proportion value, this is a proportion of the difference of the last recalled scene or direct level and 0 %, which so happens to be a proportion of the level itself. For example, if the level is at 44% and you send a command to perform the ‘Direct Proportion’ function at –50 %, then the level decreases to 22 % (= 50 % × 44 %).
Notes:
|
Single Press mode is set to call a fixed light scene by default but, like any other mode, can be configured to perform any function.
To change the function of the mode:
In the Press section, click in the Function field.
Note:
|
Click ![]() , and then select your desired function from the drop-down menu.
, and then select your desired function from the drop-down menu.
Click ![]() .
.
To change the scene to call:
In the Press section, click in the Scene Number field.
Enter the scene that you want to call upon the button press.
Click ![]() .
.
The fade time is the time it takes the channel(s) to change from one scene to another.
In the Press section, click in the Fade Time field.
Note:
|
Enter the fade time for the function.
Click ![]() .
.
If you want the subdevice to perform the function according to a certain condition:
In the Press section, click in the Condition field.
Note:
|
Click ![]() , and then select the condition from the drop-down menu.
, and then select the condition from the drop-down menu.
Click ![]() .
.
For more information, see Conditions.
The Toggle Block is, by default, an On/Off button and therefore has two functions, but you can set and configure any three functions to the this button mode.
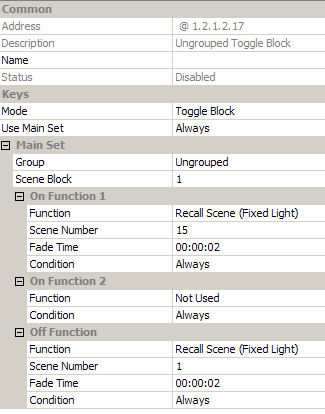
When all three functions are used, the Toggle Block operates as follows:
First button press performs On Function 1.
Second button press performs On Function 2.
Third button press performs Off Function.
Note:
|
To change this function of the mode:
In the On Function 1 section, click in the Function field.
Note:
|
Click ![]() , and then select your desired function from the drop-down menu.
, and then select your desired function from the drop-down menu.
Click ![]() .
.
To change the scene to call:
In the Press section, click in the Scene Number field.
Enter the scene that you want to call upon the button press.
Click ![]() .
.
The fade time is the time it takes the channel(s) to change from one scene to another.
In the On Function 1 section, click in the Fade Time field.
Note:
|
Enter the fade time for the function.
Click ![]() .
.
If you want the subdevice to perform the function according to a certain condition:
In the On Function 1 section, click in the Condition field.
Note:
|
Click ![]() , and then select the condition from the drop-down menu.
, and then select the condition from the drop-down menu.
Click ![]() .
.
For more information, see Conditions.
By default, this function is not used, but you can set this function of the mode:
In the On Function 2 section, click in the Function field.
Note:
|
Click ![]() , and then select your desired function from the drop-down menu.
, and then select your desired function from the drop-down menu.
Click ![]() .
.
To change this function of the mode:
In the Off Function section, click in the Function field.
Note:
|
Click ![]() , and then select your desired function from the drop-down menu.
, and then select your desired function from the drop-down menu.
Click ![]() .
.
To change the scene to call:
In the Press section, click in the Scene Number field.
Enter the scene that you want to call upon the button press.
Click ![]() .
.
The fade time is the time it takes for the channel(s) to change from one scene to another.
In the Off Function section, click in the Fade Time field.
Note:
|
Enter the fade time for the function.
Click ![]() .
.
If you want the subdevice to perform the function according to a certain condition:
In the Off Function section, click in the Condition field.
Note:
|
Click ![]() , and then select the condition from the drop-down menu.
, and then select the condition from the drop-down menu.
Click ![]() .
.
For more information, see Conditions.
You can set and configure the following functions to this mode: Maximum, Minimum, Off, Direct Level, Direct Proportion, Up, Down, Warmer Colour Temperature, and Cooler Colour Temperature.
Note:
|
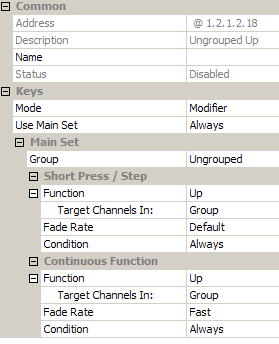
You can set and configure two functions of the mode: Short Press and Continuous Function (press and hold).
To change this function of the mode:
In the Short Press / Step section, click in the Function field.
Note:
|
Click ![]() , and then select your desired function from the drop-down menu.
, and then select your desired function from the drop-down menu.
Click ![]() .
.
By default, this mode affects all channels (loads) in the group, but you can configure it to affect just the channels used in a specific scene, or the channels used in the last selected scene.
Tip:
|
In the Short Press / Step section, click in the Target Channels In field.
Note:
|
Click ![]() , and then select your desired set from the drop-down menu.
, and then select your desired set from the drop-down menu.
Click ![]() .
.
Note:
|
To set the fade rate (the rate at which levels will change):
In the Short Press / Step section, click in the Fade Rate field.
Note:
|
Enter the fade rate for the function.
Click ![]() .
.
If you want the subdevice to perform the function according to a certain condition:
In the Short Press / Step section, click in the Condition field.
Note:
|
Click ![]() , and then select the condition from the drop-down menu.
, and then select the condition from the drop-down menu.
Click ![]() .
.
For more information, see Conditions.
This function is used when you press and hold the button.
In the Continuous Function section, repeat the steps for Short Press function above.
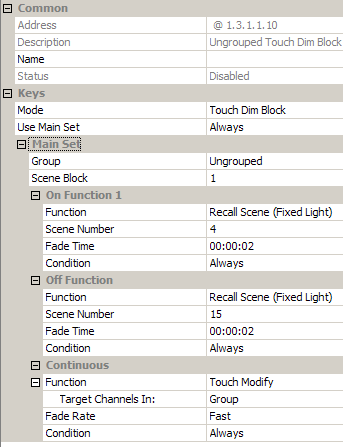
Touch Dim Block/Solo mode allows you to configure three functions for the same subdevice (button): an on function, an off function and a continuous (press and hold) function. You can set and configure any three functions to the button mode.
Note:
|
To change the function of the mode:
In the On Function 1 section, click in the Function field.
Note:
|
Click ![]() , and then select your desired function from the drop-down menu.
, and then select your desired function from the drop-down menu.
Click ![]() .
.
To change the scene to call:
In the Press section, click in the Scene Number field.
Enter the scene that you want to call upon the button press.
Click ![]() .
.
The fade time is the time it takes the channel(s) to change from one scene to another.
In the On Function 1 section, click in the Fade Time field.
Note:
|
Enter the fade time for the function.
Click ![]() .
.
If you want the subdevice to perform the function according to a certain condition:
In the Off Function section, click in the Condition field.
Note:
|
Click ![]() , and then select the condition from the drop-down menu.
, and then select the condition from the drop-down menu.
Click ![]() .
.
For more information, see Conditions.
To change the function of the mode:
In the Off Function section, click in the Function field.
Note:
|
Click ![]() , and then select your desired function from the drop-down menu.
, and then select your desired function from the drop-down menu.
Click ![]() .
.
To change the scene to call:
In the Press section, click in the Scene Number field.
Enter the scene that you want to call upon the button press.
Click ![]() .
.
The fade time is the time it takes the channel(s) to change from one scene to another.
In the Off Function section, click in the Fade Time field.
Note:
|
Enter the fade time for the function.
Click ![]() .
.
If you want the subdevice to perform the function according to a certain condition
In the Off Function section, click in the Condition field.
Note:
|
Click ![]() , and then select the condition from the drop-down menu.
, and then select the condition from the drop-down menu.
Click ![]() .
.
For more information, see Conditions.
Note:
|
You cannot change this function of the mode, you can only disable the function:
In the Continuous section, click in the Function field.
Note:
|
If you want to not use the touch modify function, click ![]() , and then select Not Used from the drop-down menu.
, and then select Not Used from the drop-down menu.
Click ![]() .
.
Note:
|
Tip:
|
In the Continuous section, click in the Target Channels In field.
Note:
|
Click ![]() , and then select your desired set from the drop-down menu.
, and then select your desired set from the drop-down menu.
Click ![]() .
.
Note:
|
The fade time is the time it takes for the channel(s) to change from one scene to another.
In the Continuous section, click in the Fade Rate field.
Note:
|
Enter the fade rate for the function.
Click ![]() .
.
If you want the subdevice to perform the function according to a certain condition.
In the Continuous section, click in the Condition field.
Note:
|
Click ![]() , and then select the condition from the drop-down menu.
, and then select the condition from the drop-down menu.
Click ![]() .
.
The subdevice is now configured and ready for use in the lighting system.
For more information, see Conditions.