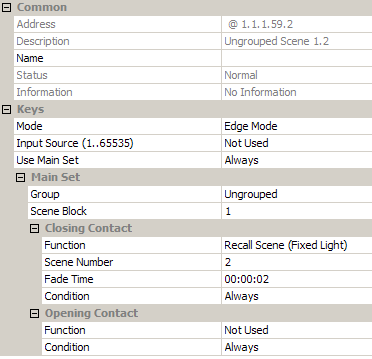
Edge Mode Configuration |
|||
Note:
|
Click ![]() to expand
the Analogue Input Unit or Mini Input Unit in the Devices
View.
to expand
the Analogue Input Unit or Mini Input Unit in the Devices
View.
Click on the subdevice that you
want to set to edge mode. Notice
that all subdevices of the Input Unit are set to ![]() edge
mode by default.
edge
mode by default.
If the Properties view for the subdevice is not already open, select View > Properties, or press F4.
If necessary, in the Keys section, click in the Mode field.
Click ![]() , and
then select Edge Mode from the drop-down menu.
, and
then select Edge Mode from the drop-down menu.
Click ![]() . The mode of the subdevice is now set to
edge mode.
. The mode of the subdevice is now set to
edge mode.
In the Keys section, click in the Input Source field. This field corresponds to the input source on the subdevice of the Analogue Input Unit.
Enter a value in the range of 1 to 65535. (Enter 0 or press Delete to set to Not Used).
Click ![]() .
.
If you want the subdevice to perform the set of functions according to a certain condition, and if the condition is not met then to use an alternative set of functions (see Conditions):
Note:
|
In the Keys section, click in the Use Main Set field. Notice that the condition is set to Always by default.
Click ![]() , and
then select the condition from the drop-down menu.
, and
then select the condition from the drop-down menu.
Click ![]() .
.
Tip:
|
In the Main Set section, click in the Group field.
Enter the group to which you want the slider to be assigned. (0 = Ungrouped).
Click ![]() .
.
The DALI standard specifies that the subdevices in a device may be assigned only to scenes within the same scene block. This is why it is necessary to choose a scene block, rather than choose any scene in the Workgroup Design.
Tip:
|
In the Main Set section, click in the Scene Block field.
Enter the scene block to which you want the subdevice to be assigned.
Click ![]() .
.
By default, the function is set to Recall Scene (Fixed Light). To change the function:
In the Closing Contact section, click in the Function field. Notice that the function is set to Recall Scene (Fixed Light) by default.
Click ![]() , and
then select the function from the drop-down menu.
, and
then select the function from the drop-down menu.
Click ![]() .
.
To change the scene to call:
In the Closing Contact section, click in the Scene Number field.
Enter the scene that you want to call upon the button press.
Click ![]() .
.
The fade time is the time it takes the channel (s) to change from one scene to another.
In the Closing Contact section, click in the Fade Time field. Notice that it is set to 2 seconds by default.
Enter the fade time for the function.
Click ![]() .
.
If you want the analogue input to perform the function according to a certain condition (see Conditions):
In the Closing Contact section, click in the Condition field. Notice that the condition is set to Always by default.
Click ![]() , and
then select the condition from the drop-down menu.
, and
then select the condition from the drop-down menu.
Click ![]() .
.
The opening contact function is set to Not Used by default. If you want to use this function:
In the Opening Contact section, configure as above.