Time Triggered Ethernet Output |
|||
Note:
|
To configure a Time Triggered Ethernet Output, make sure that the scheduler entry is selected in the Scheduler view, and then do the following in the Properties view:
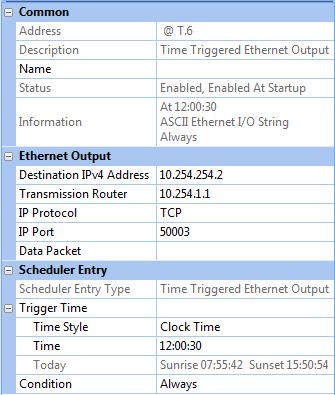
To configure the Ethernet Output:
In the Ethernet Output section, click in the IPv4 Address field. Enter the IP address of the third-party device to which you are connecting.
In the Transmission Router field, enter the IP address of the router responsible for sending data packets that communicate with third-party devices.
In the IP
Protocol field, click ![]() and
choose between ' TCP ' and ' UDP ' data transmission protocols.
and
choose between ' TCP ' and ' UDP ' data transmission protocols.
In the IP Port field, enter the listener port (for TCP) or comms port (for UDP).
In the Data Packet
field, enter \x if you want
to view messages in hexadecimal format. By default, the field is left
blank and, as a result, messages will be viewed in ASCII format.
Note:
|
To configure a Scheduler Entry:
Click in the Time
Style field, and then click ![]() .
.
Select either Clock Time (for 24-hour clock time), Dawn Time or Dusk Time (to configure enabling of Daylight Saving relative to the pre-determined dusk or dawn times).
If you chose Clock Time in the Time Style field, to set the time at which Daylight Saving is enabled:
Click in the Time
field, and then click ![]() .
.
Enter the time (in hh:mm:ss) at which to enable Daylight Saving.
Click ![]() to apply the changes.
to apply the changes.
Tips:
|
If you chose Dusk Time or Dawn Time in the Time Style field, to set the time at which Daylight Saving is enabled, relative to the Dusk/Dawn time:
Click in the Offset
field, and then click ![]() .
.
Enter the time (in mins), before or after the Dusk/Dawn time, at which to enable Daylight Saving.
Click ![]() to apply the changes.
to apply the changes.
If you want to apply a condition to the scheduler entry:
Click in the Condition
field, and then click ![]() .
.
Select a condition from the drop-down menu.
Click ![]() to apply
the changes.
to apply
the changes.